
Xử lý dữ liệu từ onboarding trong React Native SDK
Onboarding đã bị deprecated trong SDK v4 và sẽ bị xóa trong phiên bản tương lai. Chúng không còn nhận được các bản sửa lỗi hay cải tiến nữa. Hãy sử dụng flows thay thế: không giống như onboarding chạy bên trong WebView, flows render trực tiếp trên thiết bị — mang lại hiệu ứng chuyển động mượt mà hơn, giao diện native nhất quán, thời gian tải nhanh hơn và không phụ thuộc vào WebView runtime. Xem Lấy flows & paywalls và Hiển thị flows & paywalls để bắt đầu.
Khi người dùng trả lời câu hỏi trong quiz hoặc nhập dữ liệu vào ô input, phương thức onStateUpdatedAction sẽ được gọi. Bạn có thể lưu hoặc xử lý loại trường dữ liệu đó trong code của mình.
Ví dụ:
// Full-screen presentation
const unsubscribe = view.setEventHandlers({
  onStateUpdated(action, meta) {
    // Process data
  },
});

// Embedded widget
<AdaptyOnboardingView
  onboarding={onboarding}
  eventHandlers={{
    onStateUpdated(action, meta) {
      // Process data
    },
  }}
/>
Xem định dạng action tại đây.
Ví dụ dữ liệu đã lưu (định dạng có thể khác nhau tùy cách triển khai của bạn)
// Example of a saved select action
{
    "elementId": "preference_selector",
    "elementType": "select",
    "value": {
        "id": "option_1",
        "value": "premium",
        "label": "Premium Plan"
    },
    "meta": {
        "onboardingId": "onboarding_123",
        "screenClientId": "preferences_screen",
        "screenIndex": 1,
        "totalScreens": 3
    }
}

// Example of a saved multi-select action
{
    "elementId": "interests_selector",
    "elementType": "multi_select",
    "value": [
        {
            "id": "interest_1",
            "value": "sports",
            "label": "Sports"
        },
        {
            "id": "interest_2",
            "value": "music",
            "label": "Music"
        }
    ],
    "meta": {
        "onboardingId": "onboarding_123",
        "screenClientId": "interests_screen",
        "screenIndex": 2,
        "totalScreens": 3
    }
}

// Example of a saved input action
{
    "elementId": "name_input",
    "elementType": "input",
    "value": {
        "type": "text",
        "value": "John Doe"
    },
    "meta": {
        "onboardingId": "onboarding_123",
        "screenClientId": "profile_screen",
        "screenIndex": 0,
        "totalScreens": 3
    }
}

// Example of a saved date picker action
{
    "elementId": "birthday_picker",
    "elementType": "date_picker",
    "value": {
        "day": 15,
        "month": 6,
        "year": 1990
    },
    "meta": {
        "onboardingId": "onboarding_123",
        "screenClientId": "profile_screen",
        "screenIndex": 0,
        "totalScreens": 3
    }
}
Các trường hợp sử dụng
Làm phong phú hồ sơ người dùng với dữ liệu
Nếu bạn muốn liên kết ngay dữ liệu đầu vào với hồ sơ người dùng và tránh hỏi họ hai lần cùng một thông tin, bạn cần cập nhật hồ sơ người dùng với dữ liệu đầu vào khi xử lý action.
Ví dụ, bạn yêu cầu người dùng nhập tên vào trường văn bản có ID là name, và bạn muốn đặt giá trị của trường này làm tên của người dùng. Ngoài ra, bạn yêu cầu họ nhập email vào trường email. Trong code của ứng dụng, nó có thể trông như thế này:
// Full-screen presentation
const unsubscribe = view.setÿÿEventHandlers({
  onStateUpdated(action, meta) {
    // Store user preferences or responses
    if (action.elementType === 'input') {
      const profileParams = {};

      // Map elementId to appropriate profile field
      switch (action.elementId) {
        case 'name':
          if (action.value.type === 'text') {
            profileParams.firstName = action.value.value;
          }
          break;
        case 'email':
          if (action.value.type === 'email') {
            profileParams.email = action.value.value;
          }
          break;
      }

      // Update profile if we have data to update
      if (Object.keys(profileParams).length > 0) {
        adapty.updateProfile(profileParams).catch(error => {
          // handle the error
        });
      }
    }
  },
});

// Embedded widget
<AdaptyOnboardingView
  onboarding={onboarding}
  eventHandlers={{
    onStateUpdated(action, meta) {
      // Store user preferences or responses
      if (action.elementType === 'input') {
        const profileParams = {};

        // Map elementId to appropriate profile field
        switch (action.elementId) {
          case 'name':
            if (action.value.type === 'text') {
              profileParams.firstName = action.value.value;
            }
            break;
          case 'email':
            if (action.value.type === 'email') {
              profileParams.email = action.value.value;
            }
            break;
        }

        // Update profile if we have data to update
        if (Object.keys(profileParams).length > 0) {
          adapty.updateProfile(profileParams).catch(error => {
            // handle the error
          });
        }
      }
    },
  }}
/>
Tùy chỉnh paywall dựa trên câu trả lời
Sử dụng quiz trong onboarding, bạn có thể tùy chỉnh các paywall hiển thị cho người dùng sau khi họ hoàn thành onboarding.
Ví dụ: bạn có thể hỏi người dùng về kinh nghiệm thể thao của họ và hiển thị các CTA cũng như sản phẩm khác nhau cho từng nhóm người dùng.
- Thêm quiz trong trình xây dựng onboarding và gán ID có ý nghĩa cho các lựa chọn.
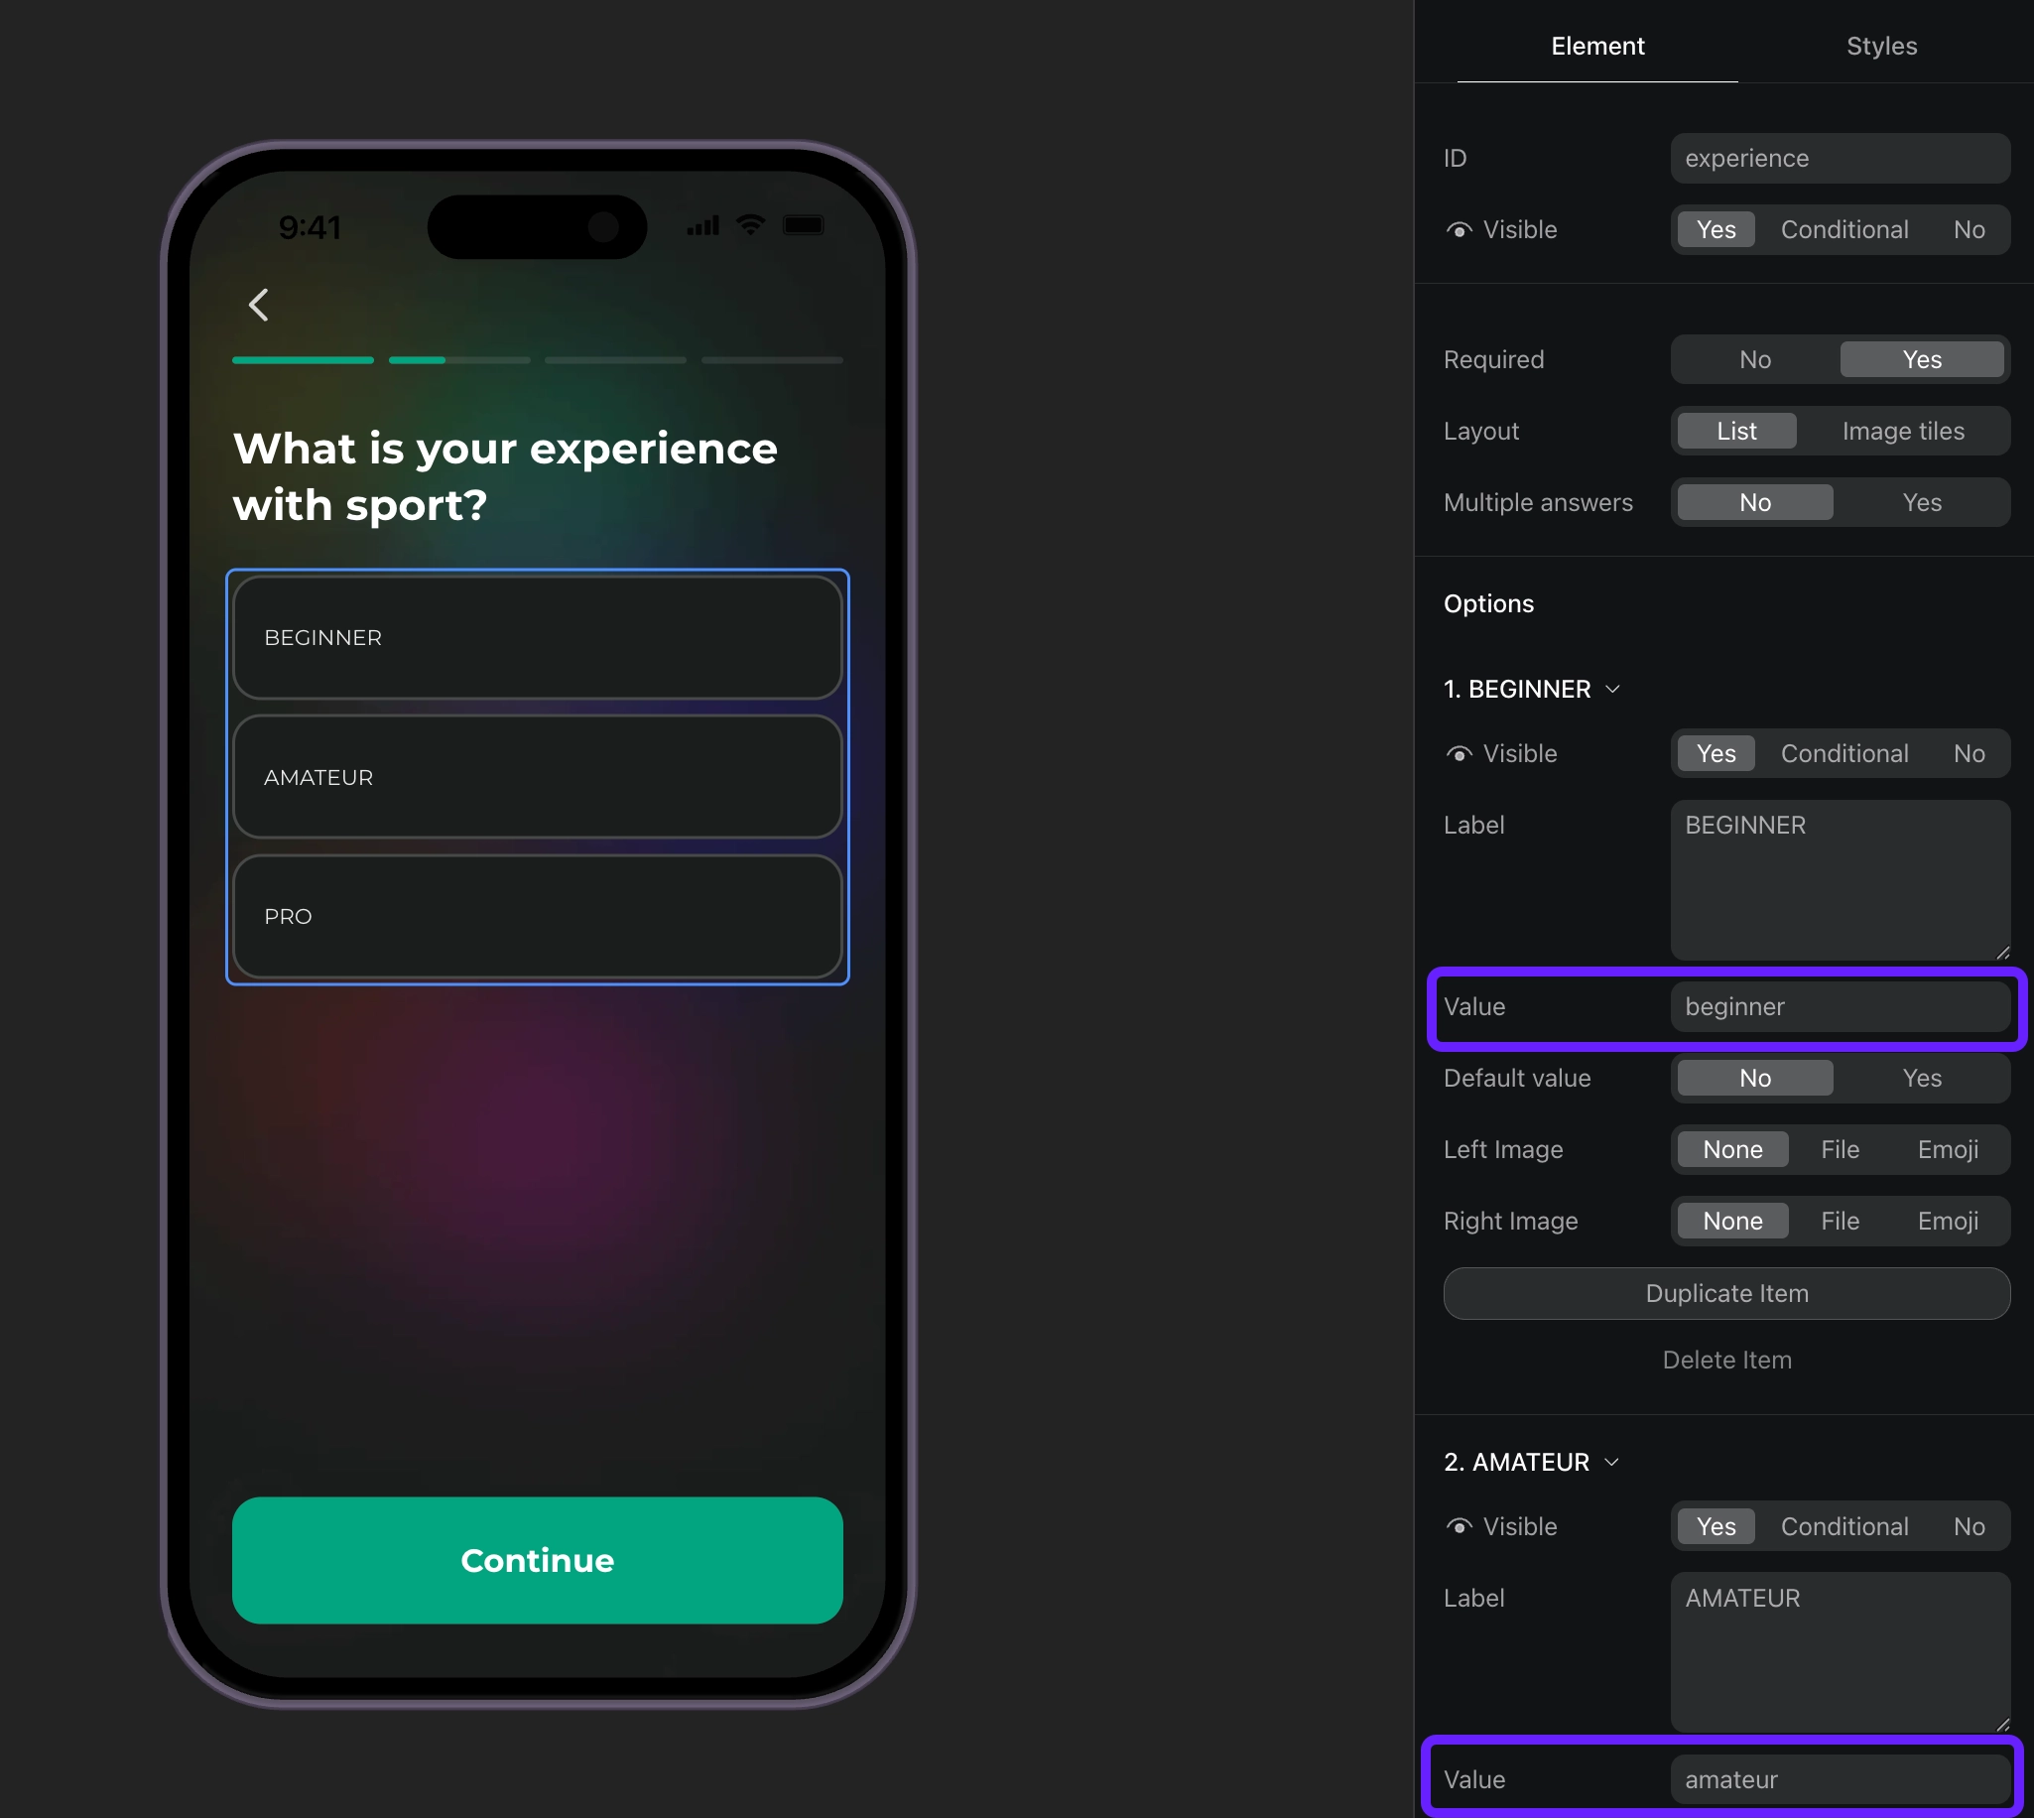
- Xử lý các phản hồi quiz dựa trên ID của chúng và đặt thuộc tính tùy chỉnh cho người dùng.
// Full-screen presentation
const unsubscribe = view.setEventHandlers({
  onStateUpdated(action, meta) {
    // Handle quiz responses and set custom attributes
    if (action.elementType === 'select') {
      const profileParams = {};

      // Map quiz responses to custom attributes
      switch (action.elementId) {
        case 'experience':
          // Set custom attribute 'experience' with the selected value (beginner, amateur, pro)
          profileParams.codableCustomAttributes = {
            experience: action.value.value
          };
          break;
      }

      // Update profile if we have data to update
      if (Object.keys(profileParams).length > 0) {
        adapty.updateProfile(profileParams).catch(error => {
          // handle the error
        });
      }
    }
  },
});

// Embedded widget
<AdaptyOnboardingView
  onboarding={onboarding}
  eventHandlers={{
    onStateUpdated(action, meta) {
      // Handle quiz responses and set custom attributes
      if (action.elementType === 'select') {
        const profileParams = {};

        // Map quiz responses to custom attributes
        switch (action.elementId) {
          case 'experience':
            // Set custom attribute 'experience' with the selected value (beginner, amateur, pro)
            profileParams.codableCustomAttributes = {
              experience: action.value.value
            };
            break;
        }

        // Update profile if we have data to update
        if (Object.keys(profileParams).length > 0) {
          adapty.updateProfile(profileParams).catch(error => {
            // handle the error
          });
        }
      }
    },
  }}
/>- Tạo phân khúc cho từng giá trị thuộc tính tùy chỉnh.
- Tạo một placement và thêm đối tượng cho từng phân khúc bạn đã tạo.
- Hiển thị paywall cho placement trong code ứng dụng của bạn. Nếu onboarding của bạn có nút mở paywall, hãy triển khai code paywall như một phản hồi cho hành động của nút này.