
Xử lý dữ liệu từ onboarding trong iOS SDK
Bắt đầu từ SDK v4, bạn có thể xây dựng flow như một lựa chọn mạnh mẽ hơn so với onboarding. Khác với onboarding chạy trong WebView, flow render trực tiếp trên thiết bị — mang lại hiệu ứng chuyển động mượt mà hơn, giao diện iOS nhất quán, thời gian tải nhanh hơn và không phụ thuộc vào WebView runtime. Xem Lấy flow & paywall và Hiển thị flow & paywall để bắt đầu.
Khi người dùng trả lời câu hỏi trong bài quiz hoặc nhập dữ liệu vào trường nhập liệu, phương thức onStateUpdatedAction sẽ được gọi. Bạn có thể lưu hoặc xử lý loại trường đó trong code của mình.
Ví dụ:
func onboardingController(_ controller: AdaptyOnboardingController, onStateUpdatedAction action: AdaptyOnboardingsStateUpdatedAction) {
    // Store user preferences or responses
    switch action.params {
    case .select(let params):
        // Handle single selection
    case .multiSelect(let params):
        // Handle multiple selections
    case .input(let params):
        // Handle text input
    case .datePicker(let params):
        // Handle date selection
    }
}
Đối tượng action chứa:
| Tham số | Mô tả |
|---|---|
elementId | Định danh duy nhất cho phần tử input. Bạn có thể dùng nó để liên kết câu hỏi với câu trả lời khi lưu lại. |
params | Đối tượng dữ liệu đầu vào của người dùng, chứa các thuộc tính type và value. |
params.type | Loại phần tử input. Có thể là: • "select" - Chọn một giá trị từ các tùy chọn• "multiSelect" - Chọn nhiều giá trị từ các tùy chọn• "input" - Trường nhập văn bản• "datePicker" - Chọn ngày |
params.value | Giá trị được người dùng chọn hoặc nhập. Cấu trúc phụ thuộc vào loại: • select: Đối tượng có id, value, label• multiSelect: Mảng các đối tượng có id, value, label• input: Đối tượng có type, value• datePicker: Đối tượng có day, month, year |
Ví dụ dữ liệu đã lưu (có thể khác với triển khai của bạn)
// Example of a saved select action
{
    "elementId": "preference_selector",
    "meta": {
        "onboardingId": "onboarding_123",
        "screenClientId": "preferences_screen",
        "screenIndex": 1,
        "screensTotal": 3
    },
    "params": {
        "type": "select",
        "value": {
            "id": "option_1",
            "value": "premium",
            "label": "Premium Plan"
        }
    }
}

// Example of a saved multi-select action
{
    "elementId": "interests_selector",
    "meta": {
        "onboardingId": "onboarding_123",
        "screenClientId": "interests_screen",
        "screenIndex": 2,
        "screensTotal": 3
    },
    "params": {
        "type": "multiSelect",
        "value": [
            {
                "id": "interest_1",
                "value": "sports",
                "label": "Sports"
            },
            {
                "id": "interest_2",
                "value": "music",
                "label": "Music"
            }
        ]
    }
}

// Example of a saved input action
{
    "elementId": "name_input",
    "meta": {
        "onboardingId": "onboarding_123",
        "screenClientId": "profile_screen",
        "screenIndex": 0,
        "screensTotal": 3
    },
    "params": {
        "type": "input",
        "value": {
            "type": "text",
            "value": "John Doe"
        }
    }
}

// Example of a saved date picker action
{
    "elementId": "birthday_picker",
    "meta": {
        "onboardingId": "onboarding_123",
        "screenClientId": "profile_screen",
        "screenIndex": 0,
        "screensTotal": 3
    },
"params": {
    "type": "datePicker",
    "vÿÿalue": {
        "day": 15,
        "month": 6,
        "year": 1990
        }
    }
}
Các trường hợp sử dụng
Làm phong phú thêm dữ liệu hồ sơ người dùng
Nếu bạn muốn liên kết ngay dữ liệu đầu vào với hồ sơ người dùng và tránh hỏi họ hai lần về cùng một thông tin, bạn cần cập nhật hồ sơ người dùng với dữ liệu đầu vào khi xử lý action.
Ví dụ, bạn yêu cầu người dùng nhập tên của họ vào trường văn bản có ID là name, và bạn muốn đặt giá trị của trường này làm tên của người dùng. Ngoài ra, bạn yêu cầu họ nhập email vào trường email. Trong code ứng dụng của bạn, nó có thể trông như thế này:
func onboardingController(_ controller: AdaptyOnboardingController, onStateUpdatedAction action: AdaptyOnboardingsStateUpdatedAction) {
    // Store user preferences or responses
    switch action.params {
    case .input(let params):
        // Handle text input
        let builder = AdaptyProfileParameters.Builder()

        // Map elementId to appropriate profile field
        switch action.elementId {
        case "name":
            builder.with(firstName: params.value.value)
        case "email":
            builder.with(email: params.value.value)
        default:
            break
        }

        // Delegate methods are synchronous; kick off the async update in a Task.
        Task {
            do {
                try await Adapty.updateProfile(params: builder.build())
            } catch {
                // handle the error
            }
        }
    default:
        break
    }
}
Tùy chỉnh paywall dựa trên câu trả lời
Sử dụng quiz trong onboarding, bạn cũng có thể tùy chỉnh các paywall hiển thị cho người dùng sau khi họ hoàn thành onboarding.
Ví dụ: bạn có thể hỏi người dùng về kinh nghiệm thể thao của họ và hiển thị các CTA cùng sản phẩm khác nhau cho từng nhóm người dùng.
- Thêm quiz trong trình tạo onboarding và gán ID có ý nghĩa cho các lựa chọn của quiz.
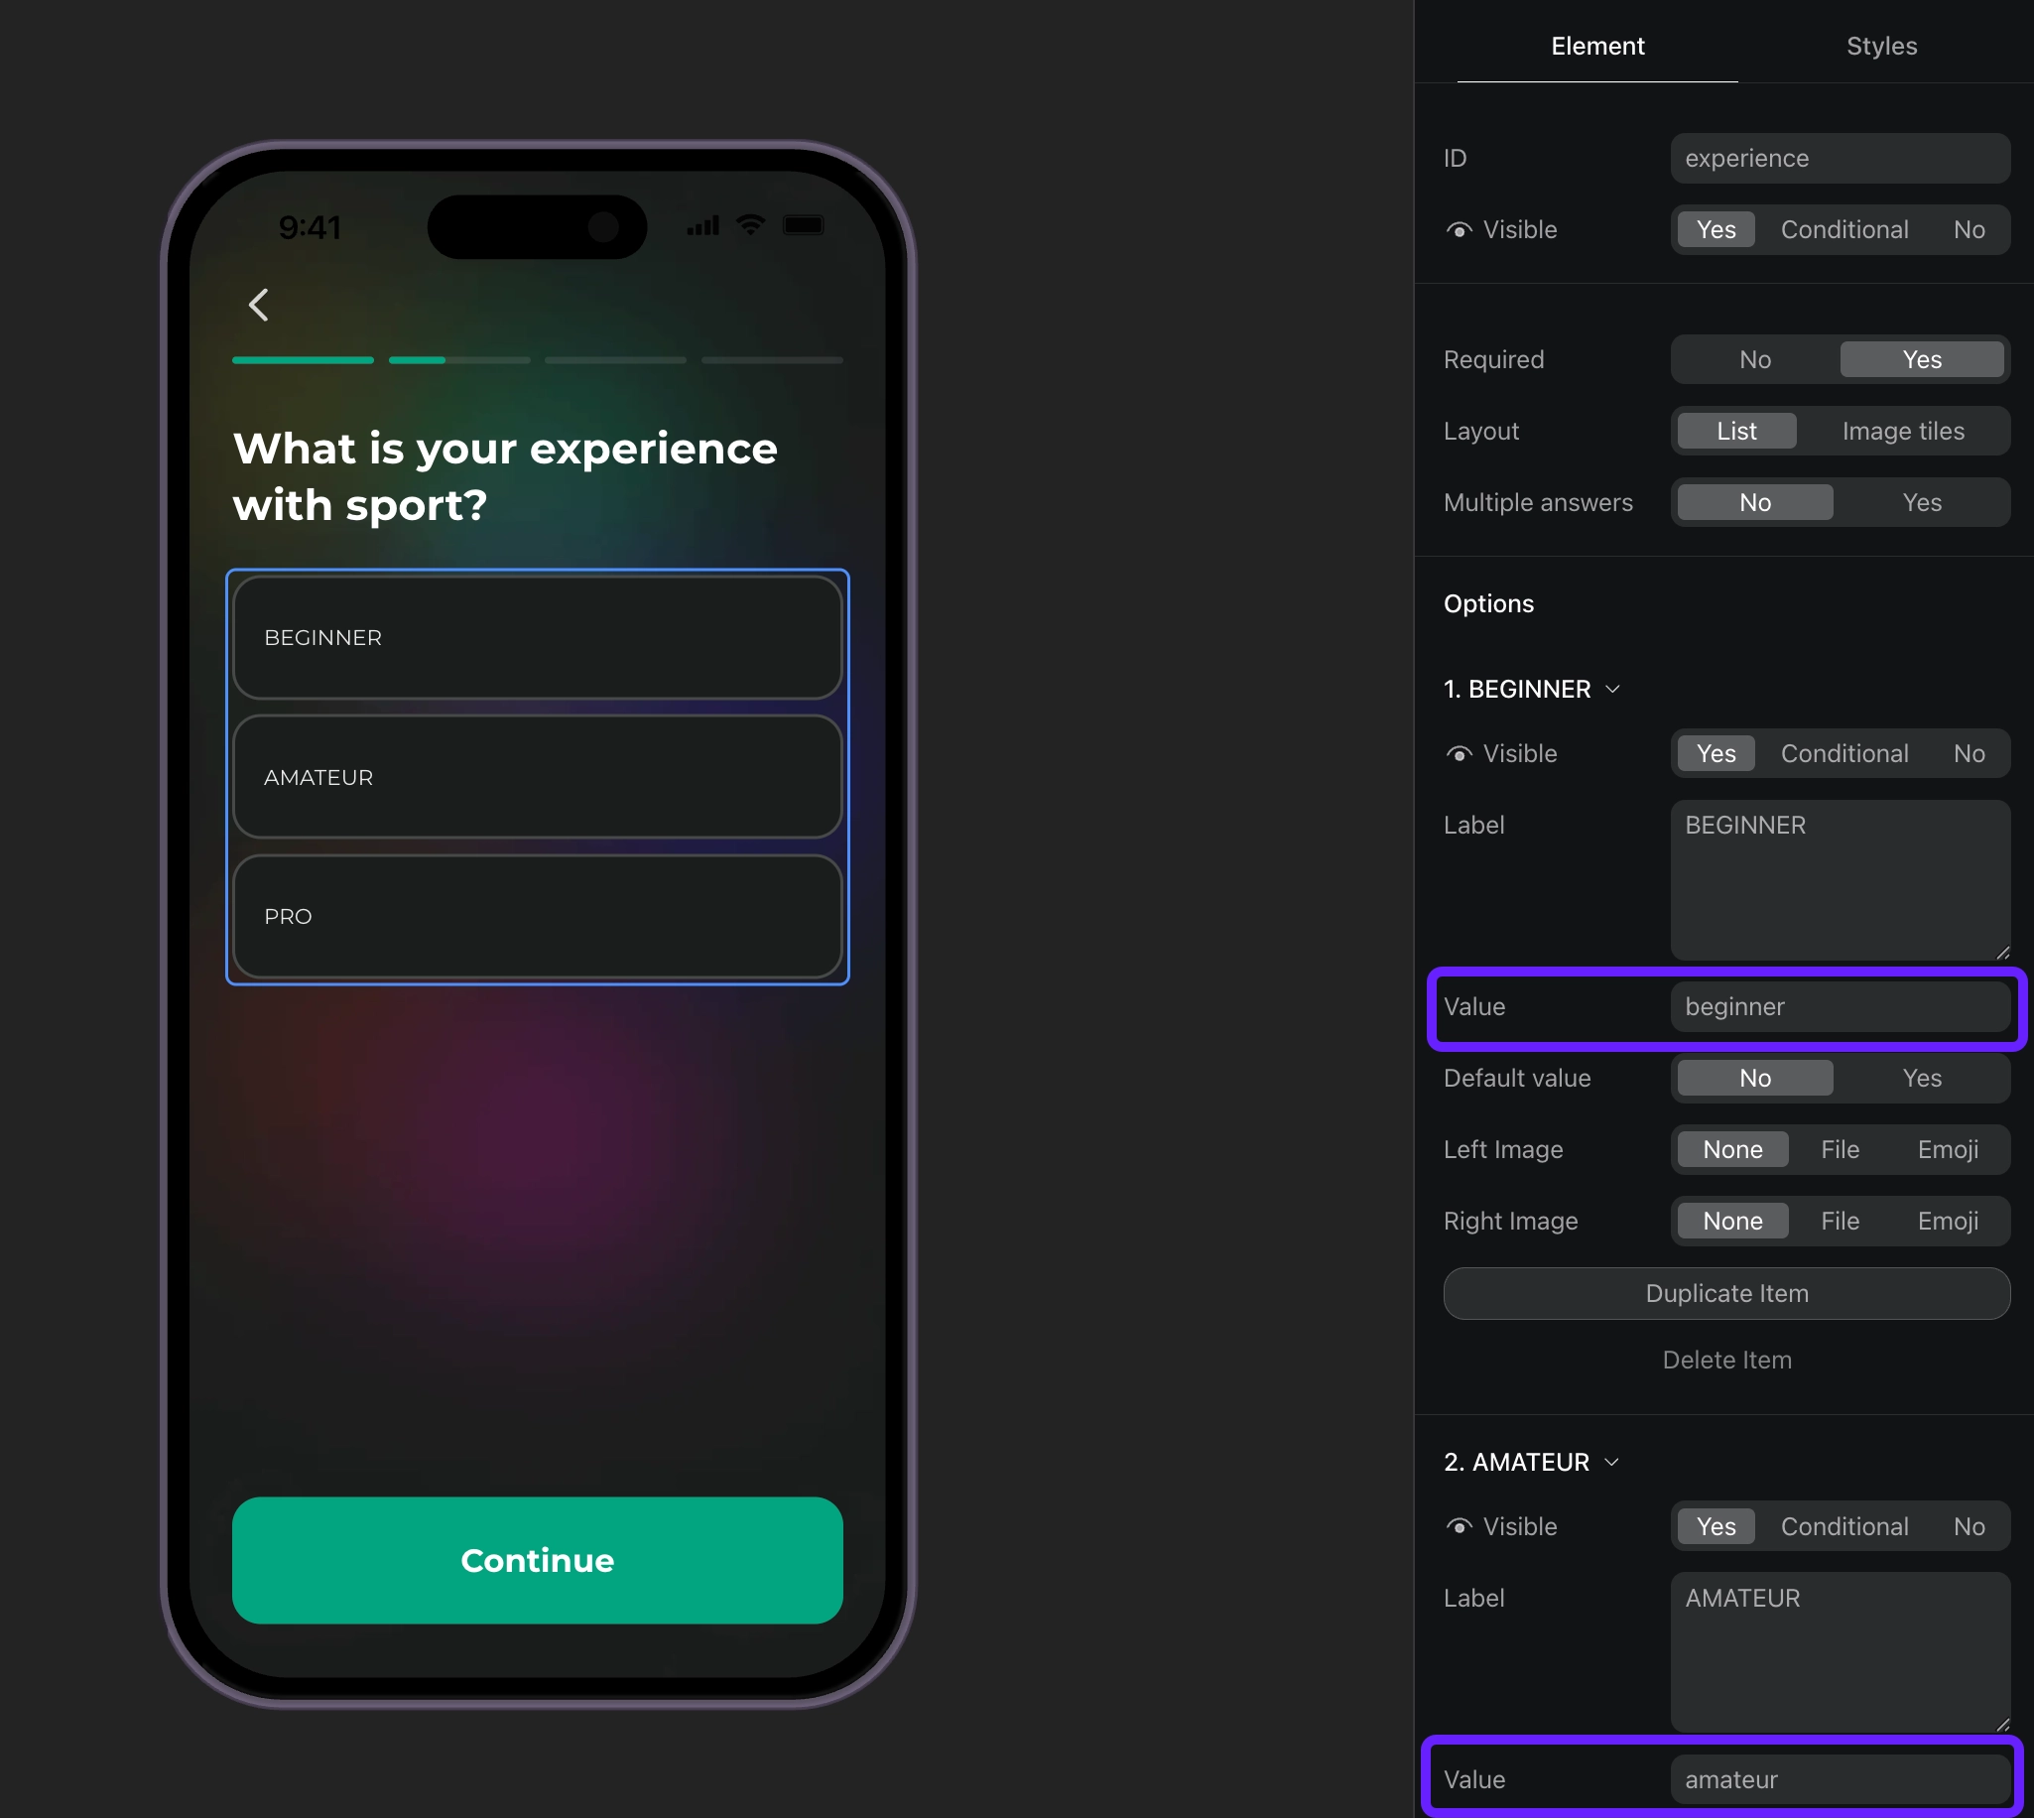
- Xử lý các phản hồi quiz dựa trên ID của chúng và đặt thuộc tính tùy chỉnh cho người dùng.
func onboardingController(_ controller: AdaptyOnboardingController, onStateUpdatedAction action: AdaptyOnboardingsStateUpdatedAction) {
    // Handle quiz responses and set custom attributes
    switch action.params {
    case .select(let params):
        // Handle quiz selection
        let builder = AdaptyProfileParameters.Builder()

        // Map quiz responses to custom attributes
        switch action.elementId {
        case "experience":
            // Set custom attribute 'experience' with the selected value (beginner, amateur, pro)
            try? builder.with(customAttribute: params.value.value, forKey: "experience")
        default:
            break
        }

        // Delegate methods are synchronous; kick off the async update in a Task.
        Task {
            do {
                try await Adapty.updateProfile(params: builder.build())
            } catch {
                // handle the error
            }
        }
    default:
        break
    }
}- Tạo phân khúc cho từng giá trị thuộc tính tùy chỉnh.
- Tạo một placement và thêm đối tượng cho từng phân khúc bạn đã tạo.
- Hiển thị paywall cho placement trong code ứng dụng của bạn. Nếu onboarding có nút mở paywall, hãy triển khai code paywall như một phản hồi cho hành động của nút này.